Producing your own charcuterie has become quite a thing which in itself has raised lots of queries. Maybe you’ve tried but the results weren’t what you were expecting, safety is a concern as bacteria and molds are involved, which cuts to use, use of nitrates, the list goes on. To get you started I’m thinking it might be helpful to have a Charcuterie 101 based on my experiences and what I do. That doesn’t mean other methods don’t work or that different pig breeds aren’t suitable this post is my experiences with OSBs.
Am I credible? I’ll let you decide, I sell my charcuterie at farmers markets, to delis, from the smallholding and have repeat custom, positive feedback from the public and chefs. In case you have any safety concerns my products have been sampled and signed off by Environment Health.
For some reason the first charcuterie I thought of producing was Salami, which isn’t the easiest place to begin, as the process requires both fermentation and curing plus you’re likely to need more equipment to get consistent results. For this post the focus is curing joints, you’ll end up with a something akin to prosciutto ham, it isn’t prosciutto but hopefully gives you an idea of what the end product will be.
Which cut of meat? You can cure pretty much any cut. Different cuts take up the cure and seasoning slightly differently and the main cuts I use are Neck/Blade, Loin, and the Ham (rear leg). In articles and books you’ll see reference to whole muscle and that’s what we’re after when butchering. Getting a whole muscle ensures that there are few if any cuts deep into the meat thereby reducing the opportunity for bad bacteria to get in and infect the meat. I’ve been influenced by Italian salumi and refer to the muscles/cuts using the Italian naming mainly because it sounds far more intriguing / exotic than English!
Coppa – is the collar /neck muscle. Usually when cutting the primal cuts you’ll cut between ribs 5 and 6, ask your butcher to extend this to 6 and 7 to give you a larger Coppa. Depending on the age of the pig it will be at least 1Kg. In Italian it is also known as Capocollo, which translates as “head of the neck“. The Coppa has a good mix of meat and fat which means it takes the cure well and the fat marbling looks very attractive.
Lonza – is the loin. You’re probably already using the loin for chops or back bacon. The loin should have a good covering of fat over it. BTW don’t confuse with the tenderloin.
Ham – or rear leg has 2 muscles, Culatello and Fiocco both of which I cure. Proscuitto comes from the Culatello. These muscles have a lot less fat than the Coppa and are smaller.
Cure Ingredients
The basic cure is the same for all muscles;
- 2.75% Salt
- 0.25% #2 cure or #1 if the ham will be cooked at high temperatures e.g. pizza topping
- 0.5% Black pepper
Then it’s whatever herbs and spices you want usually somewhere in the range 0.2-0.5%.
Traditional spices and herbs are bay leaves, garlic, cloves, star anise, juniper and rosemary. Be careful not to overdo the spices, 0.25% doesn’t sound like much but the flavours come through. For a single herb/spice I wouldn’t exceed 0.5% and if using several spices I wouldn’t exceed 0.25% of any one spice. I like smoked food. If I’m smoking a muscle I add bay leaves to the basic cure.
Method. Don’t be daunted by the number of steps they’re spread out over time and I wanted to cover everything you need to do.
- Weigh the muscle and weigh out the cure ingredients. Weighing accurately is important as you’re dealing with small quantities. I recommend a jeweller’s set of scales for measuring out the cure ingredients.
- Mix the #2 cure, salt and pepper to ensure an even distribution and then rub it will into the meat.
- Seal the meat and all the cure in a vacuum pack bag. It’s important that you get all the cure out of the mixing bowl to ensure that you hit the 3% salt & #2. If you don’t have a vacuum pack machine then use a sealable bag and remove as much air as possible. I recommend a vac pack machine though, more on equipment later.
- Label. I attach a label to the vac pack. The label has what it is e.g Juniper Coppa and the start date on it. Leave space as you will add the drying date, drying weight, 30%, 40% and final weight.
- Refrigerate for at least 2 weeks turning regularly. As we are using the equilibrium salting method there’s no chance of over salting the meat, so you can wait longer than 2 weeks. I usually allow 3 weeks or a month.
- After 3 weeks remove the meat and wash thoroughly and dry with a paper towel.
- If smoking now is the time to put it in your cold smoker. If there’s interest I can do a short post on smoking.
- The next 4 steps are optional, however for me it produces a better product;
- About 2 hours before you’ll need them soak the bung(s) and mix up a small amount of Mold-600 with tepid water.
- Place, more likely, stuff the muscle into a bung and exclude any excess air. You want the bung to be a tight fit. A bung is part of a cow’s intestine and we’re casing the meat which helps to keep unwanted mold off the meat.
- Paste the outside of the bung with Mold 600 culture. Mold-600 is Penicillium Nalgiovense, which is the white mold you see on French charcuterie. Paint on with a pastry brush on the outside of the bung. This will kick start a white bloom and help keep the unwanted molds at bay. Mold-600 is expensive but a little goes a long way and it keeps in the freezer.
- Prick the bung which will allow any air to escape as the muscle dries.
- Tie so that you can hang the meat.
- Weigh and update label. On the label I add the drying date, current weight, calculate the 30% and 40% moisture loss weights and put those on the label and leave space for the final weight and date.
- Hang in a cool room (10-15°C) around 75% humidity with very little airflow. Whole muscle curing is not as sensitive as salamis so there is some tolerance on this. I do recommend having some way to measure humidity and temperature, especially humidity, as then you can catch any changes early and take appropriate action to avoid spoiling your hard work.
- Depending on the size of the muscle it will take 2-4 months to lose sufficient moisture. Check the weight regularly. Keep a watch for any green or unpleasant molds. Wash down with white wine vinegar to remove them. If you did step 8 you’re unlikely to need to do this.
- When the muscle gets to 40% moisture loss i.e. weighs 60% of the start weight remove from the bung, vac pack and refrigerate. Update the label with actual weight and date. If you didn’t do step 8 you will probably need to wash down the muscle with white wine vinegar to remove any unpleasant mold.
Equipment
Essential – Set of Jeweller’s Scales – the set I have measure up to 500g in increments of 0.01g. I would recommend buying a branded make which can be calibrated e.g. Brecknell EPB-500
Essential – seems obvious but large bowl to hold meat and cure; you don’t want to lose any of the cure
Essential – Scales to weigh the meat. These scales don’t need to be as accurate as those weighing the cure ingredients, so kitchen scales will suffice. Because I’m selling to the public I have a commercial set of scales that can be calibrated. They weren’t that expensive about £85.
Recommended – Vacuum Packer. I’m in two minds as to whether a vac packer is essential or recommended. You can get away with sealable plastic bags but for me vac pack is the way to go. You don’t need a commercial vac packer, use the embossed vac pack bags and a domestic vac packer which is way cheaper. Butchers Sundries sell one for just over £30 and Weschenfelder have a more robust machine for £200. I have both, the Weschenfelder is the go to for me. If you have a domestic vac packer you’ll need to purchase embossed vac bags. Look carefully at what you’re buying as they come in different thicknesses as well as sizes. I’d recommend getting a free sample or just buying a small quantity first time as I’ve found not all vac packs work with all vac packers.
Recommended – Home Charcuterie by Paul Thomas. If you’re only going to buy one book I recommend this one. I’ve got quite a few others!
Recommended – some way to measure Temperature and Humidity just so you know what you’re dealing with. There are hundreds of devises out there. Currently I’m using devises from Switchbot that log the data and send alerts. The loggers are less than £15 and the hub which you’ll only need one of was about £30-40.
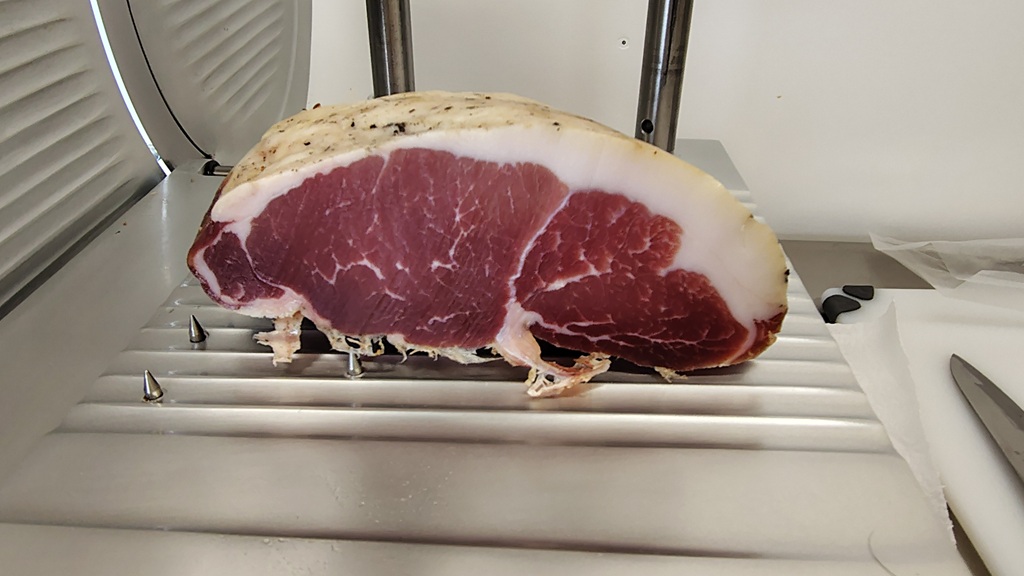
Recommended – Slicer – Unless you are very good at slicing with a knife you’ll want a slicer to slice those wafer thin slices. I’ve not come across a domestic slicer that’s up to the job and commercial slicers are very expensive. However you can pick up a second hand one on ebay for not much money, also Weschenfelder have a selection of reasonably priced slicers.
Desirable – Humidifier to up the humidity. I don’t usually need a humidifier when curing whole muscle the room I use is humid enough. These are around £30-50. I use it in conjunction with a humidistat when making Salamis so you need to ensure that it can operate that way. If using stand alone then any will suffice.
Desirable – Dehumidifier to reduce the humidity. Again I don’t usually need a dehumidifier when curing whole muscle the room I use is humid enough, but it depends on the weather. Dehumidifiers are more expensive I think mine were about £150. However I still have my first one that is 30 years old and still going. Again when making Salami I connect up to a humidistat so if you want to do the same ensure the dehumidifier can operate that way.
Desirable – Temperature and humidity controllers. Vey useful as you can hook up your heating, cooling, humidifier and dehumidifiers to have full control of the environment. Inkbird are pretty reliable and reasonably priced, you’ll find them on ebay. They aren’t infallible though hence I always have additional monitoring just in case they fail.
Suppliers
Weschenfelder (https://www.weschenfelder.co.uk/) – quality products, not the cheapest but got everything you want.
Butchers Sundries (https://butchers-sundries.com/) – good product range, often get my vac bags from here
Scobies (https://www.scobiesdirect.com/) – I’ve bought bungs, casings and other sundries.
Tips
Keep notes – there’s nothing worse than not knowing what you did before and hence what you need to do to tweak your recipe or method. Put your ingredient percentages on the back of the label.
Go easy on the specialty spices or herbs they can have very strong flavours the difference between pleasant and unpleasant can be quite small. e.g. cloves and nutmeg.
Make what you like. If you like it then there’s a good chance others will as well.